
Manual Setup
These steps should only be used if you need to access the Andover Web.Client directly and cannot use https://remote.fmd.uga.edu.
Update: A fix for .Net versions 4.5.x and support for IE11 has been released. The .Net fix has been added to the Andover installation script linked below. Information about the fix can be found in the detailed setup instructions found further down on this page. After completing all installation steps including running the Andover installation script you must restart your computer.
To be able to access the Andover Web.Client using Internet Explorer 10 or 11 ‘uga.edu‘ must be added to the Compatibility View Settings.
To setup the web.Client with this new script use the following procedure. This set of steps should only need to be performed once on each computer accessing the Andover web.client unless these settings are changed by another application.
1. Click on the link above. This will download the needed file.
2. Extract and run the file through your browser or from your ‘Downloads’ directory. If you are using Windows 7 or newer you will be prompted to run the file as an Administrator. Please see your IT staff if you need them to provide assistance to proceed past this step.
3. Start Internet Explorer and go to the web.Client website, https://webclient.uga.edu.
4. Install the ActiveX control by clicking the yellow box at the top or bottom of the browser that will appear. You should select ‘Install’. This will potentially bring up another prompt. Select ‘Yes’ or ‘OK’ to continue.
5. For Internet Explorer versions 10 and 11 add uga.edu to the Compatibility View Settings by selecting the gear in the top right hand corner of the browser, selecting Compatibility View settings, typing uga.edu into the ‘Add this website’ box, and then clicking ‘Add’.
6. Restart your computer.
7. Start Internet Explorer and go to the web.Client website, https://webclient.uga.edu.
8. Click ‘Allow’ on the pop-up box that comes up.
9. Login for the first time using your provided credentials.
The web.Client should be fully functional at this point with the exception of the pinpoint graphics. The graphics will prompt to install the necessary files when the first graphic is viewed. If you still have issues please go through the individual steps found below. This script has been tested and works on Windows XP and Windows 7 machines running Internet Explorer 8, 9, 10, or 11.
Without following the instructions below, you will not be able to navigate web.Client correctly. These instructions enable you to log-in, view schedules correctly, and view temperature probes/graphics correctly. Please note that certain instructions require administrative access to your computer. Please ensure you have a local IT contact or EITS on stand-by when performing these instructions. This will NOT fix the ability to navigate web.Client with any other browsers. web.Client can ONLY be used with version(s) IE 8, 9, or 10 at this time. Also, the web.Client will only work on Windows based operating systems. This is due to a .net requirement for scheduling
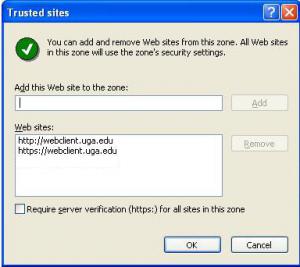
Add the web.Client sites to your computer’s trusted sites. Open Internet Explorer and navigate to Tools > Internet Options. Click on the Security tab, the Trusted Sites icon, then the Sites button. Add http://web.Client.uga.edu and https://web.Client.uga.edu.
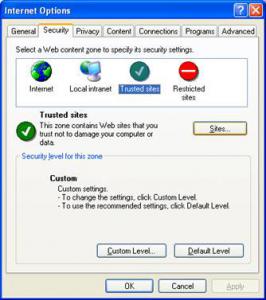
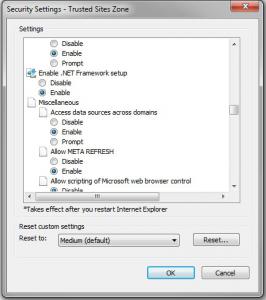
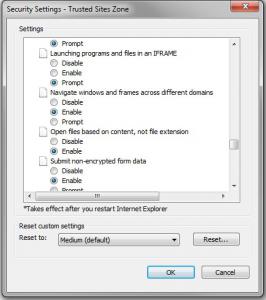
Next, select the Custom Level button and enable the following: ‘Access data sources across domains’ and ‘Navigate windows and frames across different domains’.
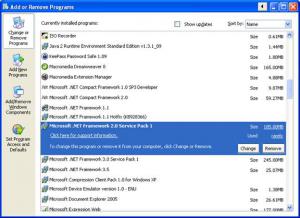
Ensure that the .Net framework 2.0 is installed on your PC. This should be listed in your Add/Remove programs. You can also check this with free tools such as the .Net Version Detector. If this is not installed you can find the software through your built in windows updater or at update.microsoft.com.
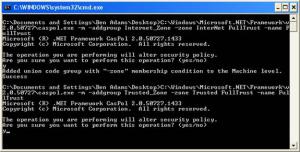
Modify Internet Explorer .Net settings. The file cap.bat will correctly modify .Net. It can be downloaded here. (right click, and save as…) Save it to your desktop and run the file. If you are using Windows 7 you will need to right click on the file you saved in the previous step and select ‘Run As Administrator’. Step through the directions and it will close when complete. You will be prompted to enter “yes” or “y” two times. You must restart your PC for changes to take effect.
For computers with .Net versions 4.5.x or newer you must complete the following steps to be able to access schedules in the Andover web.client. Please have your IT staff complete this step as incorrectly editing the Windows registry can cause system instability and/or failure.
- As an administrator, open regedit.exe.
- Navigate to HKEY_LOCAL_MACHINE\SOFTWARE\Microsoft\.NETFramework for 32 bit machines or HKEY_LOCAL_MACHINE\SOFTWARE\Wow6432Node\Microsoft\.NETFramework for 64 bit machines.
- Create a new DWORD called EnableIEHosting.
- Set the value of this DWORD to 1.
- Restart the computer.
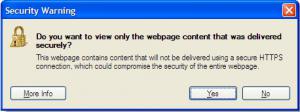
Go to https://webclient.uga.edu. You may be asked to install the correct active-x control before logging in. Also, for IE10 and 11 users, you may have to run the page in compatibility mode for it to display correctly. In addition, IE8 users may receive a popup like the following. Select ‘No’.
For more information on how to use the Andover system you can go here, Andover Quick Help.
If you have any questions, please feel free to email accesscontrol@uga.edu for assistance.